Hey everyone, I hope you’re having an incredible day today. Today, I’m gonna show you how to prepare a distinctive dish, hina dolls made with inari sushi. It is one of my favorites. For mine, I am going to make it a little bit unique. This is gonna smell and look delicious.
Hina Dolls Made with Inari Sushi is one of the most favored of recent trending foods in the world. It is easy, it’s fast, it tastes delicious. It is enjoyed by millions daily. Hina Dolls Made with Inari Sushi is something which I have loved my entire life. They are nice and they look wonderful.
How to Prepare Hina Dolls Made with Inari Sushi
To begin with this recipe, we must prepare a few components. You can cook hina dolls made with inari sushi using 19 ingredients and 14 steps. Here is how you cook that.
Ingredients
The ingredients needed to make Hina Dolls Made with Inari Sushi:
- Take 3 slice Aburaage
- Prepare 120 ml ● Dashi stock
- Make ready 3/5 tbsp ● Mirin
- Take 2 2/5 tbsp ● Raw cane sugar or castor sugar
- Prepare 1 1/5 tbsp ● Soy sauce
- Get 350 grams Uncooked white rice
- Take 180 ml Water
- Prepare 1/2 tbsp Sake
- Get 1 five 2 1/2 cm pieces Kombu for dashi stock
- Prepare 2 tbsp ◆ Vinegar
- Prepare 1 tbsp ◆ Sugar
- Make ready 1/2 tsp ◆ Salt
- Take 1 tbsp White sesame seeds
- Get To decorate:
- Make ready 2 Quail eggs
- Make ready 1/4 of a sheet Nori seaweed
- Get 1 dash Cucumber
- Make ready 1 dash Carrot
- Prepare 1 dash Black sesame seeds, ketchup
Instructions
Instructions to make Hina Dolls Made with Inari Sushi:
- Roll a chopstick over the aburaage to loosen the layers.
- Briefly soak the aburaage in boiling water for 10 seconds (the photo shows 5 aburaage sheets).
- Pat dry between paper towels. Cut each piece into half diagonally.
- Add the ● ingredients into the pot and simmer. Add the Step 3 aburaage and spoon over the simmering liquid over low heat for 5 minutes. Let cool.
- Make the sushi vinegar: Combine the ◆ ingredients in a heatproof container and microwave for 30 seconds (or so) at 500 W. Mix to dissolve the sugar.
- Make the sushi rice: Rinse the rice and cook in a rice cooker with water, sake and kombu.
- When the rice is cooked, transfer to a bowl. Add the combined sushi vinegar and mix well using a cutting motion. Fan with a fan to cool.
- Cover the rice with a wrung out moistened kitchen towel. Mix in the sesame seeds.
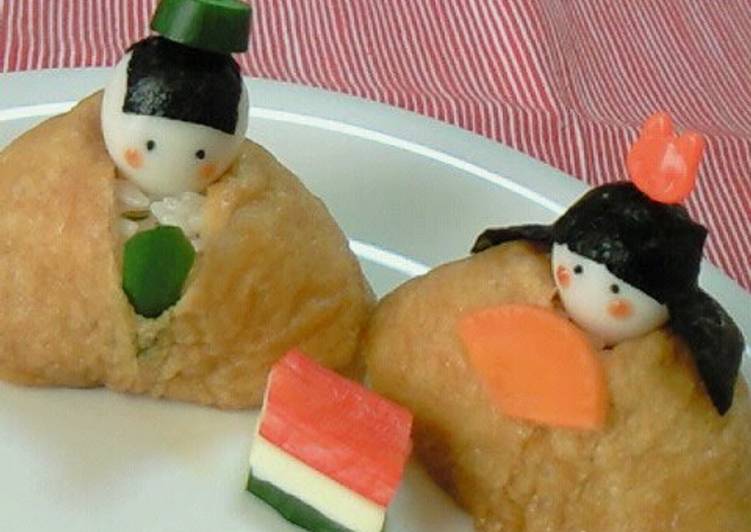
- Let's prepare the hina doll: Cut out the various parts from nori seaweed, cucumber and carrot as shown in the photo.
- Lightly drain the simmered aburaage from Step 4, and cut the corners as shown in the photo. Chop up the cut off corners and mix in to the sushi rice.
- Form about 60 g of the sushi rice into a fat triangular ball, and wrap with the aburaage from Step 10.
- Pull the long piece in the back under the rice and tuck the end in under the aburaage in the front.
- Stick the nori seaweed 'hair' on a boiled quail egg, and stick on the cucumber and carrot parts. Make small holes in the egg where the eyes should go, and stick in the black sesame seeds. Paint the cheeks with ketchup.
- This is the back view.
As simple as that How to Prepare Hina Dolls Made with Inari Sushi
So that’s going to wrap this up with this special food hina dolls made with inari sushi recipe. Thank you very much for your time. I am sure that you can make this at home. There’s gonna be interesting food at home recipes coming up. Remember to save this page in your browser, and share it to your family, friends and colleague. Thanks again for reading. Go on get cooking!
Print this page